Sunday, July 15, 2012
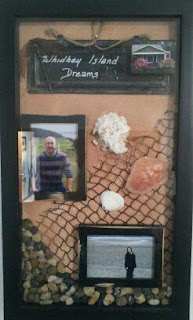
Whidbey Island Shadowbox
I don't often have occasion to do "coastal" pieces, and I love them, so this one was an absolute joy for me. More so because it was of a vacation some dear friends of mine took, and it's their dream place. So it was also a sentimental piece. BONUS! I also got to work with some new mediums, namely spray adhesive and sand.
So, for starters, before they left, knowing I planned to do this, I told them I really wanted them to bring me some sea shells. Then, during their vacation, as they posted pictures, I downloaded the ones I thought I might like to use. I did run into one snag in this operation. The day I went to start making this, I opened the small frames I had purchased and discovered one of the frames had a crack and chunk of black paint fell off. Huh. Well, I wanted to make this NOW and I was not driving 30 minutes back to the store to get another frame. So though I hadn't originally intended to distress the interior frames, that's exactly what I ended up doing. I used a knife to shave paint from the edges and couple areas on the fronts of the frames, then used my hand sander to smooth out the knicks and soften the missing paint areas. THERE IS ALWAYS A FIX.
Knowing I would have to do some of the finishing work after everything was in place and needing to make sure it fit behind the glass, I opted for a hinged shadowbox that I could open and get into once the basic background was in. Turns out, I LOVED this option.
The backing in this particular shadowbox was a canvas and I had thought to paint it, but the suggestion of sand was made. Interesting. So, I purchased a spray adhesive by Krylon - fabulous stuff. Sprayed the entire canvas and then poured sand all over it. Let it set a moment then lifted and tapped the canvas so the excess would fall off. Allowed to dry and repeated as necessary until I had the coverage I wanted. Then I sprayed the entire surface with another coat of adhesive and let it sit overnight. ****Word of advice, unlike me, I highly recommend you lay down newspaper or something before you do this. I had to use a lot of Comet to get the adhesive and sand off my counters. Also, if you get clumps of sand, or areas that you need to redo, use a large, soft paintbrush and just gently brush the sand away. It will remove any marks you don't want*****
I then laid out my pictures and embellishments to get an idea of how I wanted this to look. Then I removed them and started putting it together, working from background to foreground. The netting would go behind the embellishments, so I laid that across the canvas to partially cover the areas I wanted. I pulled it snug and used a staple gun to attach it to the back of the canvas.
I then glued down the pictures in the positions I wanted. Since one picture was on a rocky beach, I knew I wanted that near the bottom so I could glue rocks across to continue that view. What I learned - hot glue gun does not work well on sand. I ended up using E6000 glue to attach the remaining items. Once the photos were attached, I added the seashells and used a little modge podge to give the crab shell a glossy look.
For the Title piece on top, I purchased a rustic black chalkboard/metal plate and used a white chalk pen to write the title I had chosen, which was "Whidbey Island Dreams". I had cut out a picture of the cottage they stayed in and attached it to a miniature canvas, using an ink pad to blacken the sides and modge podge to affix the picture. I then used hot glue to attach an old romantic key to the opposite corner of the plate, with a ribbon tied through the key handle.
The finishing touch, and the most time consuming, was gluing all of the individual rocks to the base of the canvas traveling upwards in a soft arc from one side to the other. Again, E6000 glue was used. After the first layer of rocks was in, I started adding a second layer in sections, which is where the hinged glass came into play, making sure I didn't build too high. Once the rocks were in, I spot sprayed adhesive on the netting and lightly sprinkled a little sand here and there on the net, giving it that "beachy" look.
I fell in love with this piece, and fortunately, so did the recipients. Now, they can look at it and remember walking on the beach together, picking up seashells and they can see their dream cottage exactly as it was when they arrived.
Subscribe to:
Post Comments (Atom)


No comments:
Post a Comment