Tuesday, October 2, 2012

Memo Boards

What do you do when you come into a bunch of canvas and you're not a painter?  Make memo boards.  We start with a bunch of canvas, the fabric of your choice, a staple gun and a hammer.


Leave yourself a couple inches of fabric in all directions so you can pull it tight around to the back of the frame of the canvas.  Staple the fabric every couple inches so it stays tight.  I found that I had to use a hammer to really nail the staples in place tight.


Once your canvases are covered, you will need ribbon and either brads to hold the ribbon in place, or you can use buttons and a hot glue gun.  I prefer to use brads because I'm concerned that after time the hot glue may pull apart.  I used the staple gun to attach the ribbon to the back of the frames and then pulled it around tightly to make my design.  Be sure your ribbon is tight, so that it will hold cards, photos, lists - anything one wants to hang on the board.  To finish these off cleanly, I recommend taking them to a craft store with a framing shop and having them put brown paper on the back of the canvas to cover the staples, and then you can attach a hanger to the back of the frame, or have the framing shop do it.  They only charge a couple dollars to do it, and it's MUCH easier than trying to do it at home - you'll spend more on the supplies and time and frustration trying to get it done cleanly.

I did a variety of different designs.


This one above I did a little differently.  I used a dark purple raffia and I wanted a clothesline style, so I left the raffia loose enough to be able to hand down just a bit, then clipped on mini clothespins.


Above - I used lettered brads to spell out "I love you"


The Lady Box

This one is a little different, and was inspired by a friend of mine who is very proper and discreet. I was helping her rearrange one day, and she had a beautiful, victorian-ish box on the bathroom floor.  I asked her where she wanted it, and she informed me that it stays in the restroom.  So I asked what it was, and she said it was her "ladybox".  Turns out, it's a box that she keeps all of her monthly "lady" needs in.  I thought this would make a nice "coming of age" gift for a teen age girl that wasn't too embarrassing, and could be decorated to match her personality.   What an interesting way to store an item that usually hidden out of sight, and often inconveniently located under the bathroom sink when you really need it.  And especially for teenage girls that share a bathroom with a brother.


Basically, I just took hinged, wooden boxes and the paper of my choice and used modge podge to cover the outside of the boxes.  I then used neon chalk pens to outline the individual pieces of paper on the boxes, give it a "map-ish" sort of look.  Oh, fyi, when using chalk pens, do NOT push down on the tip, just let it flow.  If you push down, this is what happens.


Basic boxes.


These are two that I did for a couple of young girls.  The first was for a 10 year old that LOVES bright colors and funky patterns.  The second was for a 15 year old that like things bright and wild.


And the second box....


Lace Painted Barstool

Picked up this ugly old bar stool at a yard sale for $1.00.  Yay!!!!  Gonna have some fun with it.


First thing I did  was tighten up the screws on the metal band so the stool was stable and sanded down any rough spots on the stool.  Then I used a Brushed Copper spray paint and repainted the aluminum bar.


Then I used an off white semi-gloss to repaint the entire stool.


Now, the fun part.  I taped a lace doilie to the top of the stool and used the Brushed Copper spray paint to spray over the doilie.  I immediately pulled the doilie off once I was done spraying so it wouldn't dry to the stool - spray paint dries fairly quickly.  I used a small brush and the off white paint to cover any over spray from the copper outside of the lace edge.  And this is what I ended up with.


Sunday, September 23, 2012

Wildflower Swag

Kind of been slacking on the craft projects lately, but I threw together a quick swag for a friend this morning.  Started with stacks of flowers.


Attached the 2 lengths of ivy together in the center using a zip tie, then added two zip ties about 4 inches on each side from the center, layered all the flowers in the order I wanted them, then tightened the zip ties down to hold them together.  I then hotglued a strip of burlap ribbon to cover the center and hot glued the center rose onto that.  Sliced the burlap lengthwise in both directions and wound it through the floral arrangment.  Fininshed it off by adding a wire hanger to the back.


Tuesday, July 31, 2012

Travel Keepsake Box

I picked up this old handmade plywood box at a yard sale for $1.00 last week.


What to do.....

Well, how about a keepsake box?  Hold pictures and postcards and misc travel memorabilia. Why not?  I started by using a liquid distress stain in Walnut, just to darken the wood.  I'm lazy and didn't want to take off the hardware, so I discovered that a Q-Tip worked nicely for getting the stain into small places. Turned out like this.


I then tore up several pieces of travel-themed scrapbooking paper and used a brush on Distress Ink in Antique Linen to age the paper a bit.  Then I used Modge podge to glue the papers to the interior of the box.


For the embellishment on top, I used a journaling card with an old fashioned print on it, and aged the edges using Distress Ink in Vintage Photo. I punched a whole in the upper corner of the paper and tied a piece of rafia through it after sliding a small rusted star onto it, and then just tied it in a bow. I affixed it to the top of the box using glue dots.


And the end result


Monday, July 30, 2012

Young ladies first jewelry box

What to do for an 11 year old.....well, she's just starting to get a few pieces of jewelry, so maybe it's time for a "starter" jewelry box.  This one I started from a plain unfinished box and just kind of winged it.  So here is what I started with.


Supplies I used for this project: unfinished box, 1 piece of scrap booking paper 12x12, modge podge, 2 colors of paint to match/contrast the paper I chose, 1 rhinestone embellishment, 4 cut out flower shapes in differing sizes, 1 pearlized brad, Distress Ink (I used Amethyst on this one).


I started by painting the box with my two colors in a pattern I liked, including the interior walls of the drawers. While the paint dried I cut the scrapbooking paper to size for the top of the box and the front drawer, then used modge podge to affix the paper to the box. Then I used the reverse side of the paper which had a contrasting pattern and cut it to size to line the interior drawers and used modge podge to set those.


 Paint was dry, so I affixed the rhinestone embellishment to the front of the box.  I then used the Distress Ink to go over the exterior paper.  When I chose this paper, it was a hideous pattern of orange and green and purple and pink.  Using the Distress Ink softened all of the colors and made it more lavender than orange.


  For the final touch I made a paper flower by cutting petal shapes from several different papers, and again used distress ink to make the edges purple.  I connected all the petals by punching a brad through the center, and then attached it to the box using glue dots on each petal, though you could easily use hot glue or E6000.


The interior ended up like this


Sunday, July 15, 2012

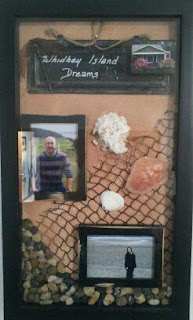
Whidbey Island Shadowbox


I don't often have occasion to do "coastal" pieces, and I love them, so this one was an absolute joy for me.  More so because it was of a vacation some dear friends of mine took, and it's their dream place.  So it was also a sentimental piece.  BONUS!  I also got to work with some new mediums, namely spray adhesive and sand.

So, for starters, before they left, knowing I planned to do this, I told them I really wanted them to bring me some sea shells.  Then, during their vacation, as they posted pictures, I downloaded the ones I thought I might like to use. I did run into one snag in this operation.  The day I went to start making this, I opened the small frames I had purchased and discovered one of the frames had a crack and chunk of black paint fell off.  Huh.  Well, I wanted to make this NOW and I was not driving 30 minutes back to the store to get another frame.  So though I hadn't originally intended to distress the interior frames, that's exactly what I ended up doing.  I used a knife to shave paint from the edges and couple areas on the fronts of the frames, then used my hand sander to smooth out the knicks and soften the missing paint areas.  THERE IS ALWAYS A FIX.

Knowing I would have to do some of the finishing work after everything was in place and needing to make sure it fit behind the glass, I opted for a hinged shadowbox that I could open and get into once the basic background was in.  Turns out, I LOVED this option.


The backing in this particular shadowbox was a canvas and I had thought to paint it, but the suggestion of sand was made.  Interesting.  So, I purchased a spray adhesive by Krylon - fabulous stuff.  Sprayed the entire canvas and then poured sand all over it.  Let it set a moment then lifted and tapped the canvas so the excess would fall off.  Allowed to dry and repeated as necessary until I had the coverage I wanted.  Then I sprayed the entire surface with another coat of adhesive and let it sit overnight. ****Word of advice, unlike me, I highly recommend you lay down newspaper or something before you do this.  I had to use a lot of Comet to get the adhesive and sand off my counters.  Also, if you get clumps of sand, or areas that you need to redo, use a large, soft paintbrush and just gently brush the sand away. It will remove any marks you don't want*****


I then laid out my pictures and embellishments to get an idea of how I wanted this to look. Then I removed them and started putting it together, working from background to foreground.  The netting would go behind the embellishments, so I laid that across the canvas to partially cover the areas I wanted. I pulled it snug and used a staple gun to attach it to the back of the canvas.


I then glued down the pictures in the positions I wanted.  Since one picture was on a  rocky beach, I knew I wanted that near the bottom so I could glue rocks across to continue that view.  What I learned - hot glue gun does not work well on sand.  I ended up using E6000 glue to attach the remaining items.  Once the photos were attached, I added the seashells and used a little modge podge to give the crab shell a glossy look.


For the Title piece on top, I purchased a rustic black chalkboard/metal plate and used a white chalk pen to write the title I had chosen, which was "Whidbey Island Dreams".  I had cut out a picture of the cottage they stayed in and attached it to a miniature canvas, using an ink pad to blacken the sides and modge podge to affix the picture.  I then used hot glue to attach an old romantic key to the opposite corner of the plate, with a ribbon tied through the key handle.

The finishing touch, and the most time consuming, was gluing all of the individual rocks to the base of the canvas traveling upwards in a soft arc from one side to the other.  Again, E6000 glue was used. After the first layer of rocks was in, I started adding a second layer in sections, which is where the hinged glass came into play, making sure I didn't build too high.  Once the rocks were in, I spot sprayed adhesive on the netting and lightly sprinkled a little sand here and there on the net, giving it that "beachy" look.


I fell in love with this piece, and fortunately, so did the recipients.  Now, they can look at it and remember walking on the beach together, picking up seashells and they can see their dream cottage exactly as it was when they arrived.

Monday, July 9, 2012

Polar fleece tie blanket


This is one of the funnest projects I've done and really easy if you want to make a practical, home made gift for a chilly loved one.  I did this one for a dear friend who got accepted to BSU this fall - so naturally, he needed a football blanket in the appropriate school colors!

I started with 2 cuts of polar fleece, one of each color.  I went with 2 1/2 yards in length which gives you 7 1/2 feet.  And bolts are usually about 4 feet wide.  You're going to lose 8 inches in length and width when you do your cutting and tying, so account for that when you decide on the length.

The first thing I did was lay my two pieces of fabric together and pinned them about every 6 inches all the way around, just to keep them from shifting.  I then cut off any excess from either side to make the pieces even all the way around - save those long strips, they work really well to tie up your finished rolled up blanket and it looks darling.


After the trimming is done, take a ruler to each of the four corners and cut out a square 4 inches deep in each direction.  Save those pieces for something I'll figure out later - hand warmers or sachets or something.


Once you have your corners cut out, run a strip of painters tape from one end of the blanket to the other on all four edges, lining up the tape at the four inch deep mark.  Measure your tape depth periodically along the length.  When I did this I found that I had gotten off by an inch or so now and then and had to adjust my tape.  This is the best way I found to make sure that you keep all your cuts 4 inches deep.


Now, you're taped and pinned and evened out and ready to begin cutting.  Make a four inch deep cut about every 2 inches all the way down the length of the blanket and the ends of the blanket. (This is where my heart kind of stopped for a moment when I started cutting up the fabric - it's ok, the feeling will pass.)


Now, you're done cutting and probably tired of cutting, so you can start tying. Tie each of your four inch strips in a double knot, going in opposite directions (so my first knot I did the underside color over the top, and the second the top color over the bottom).  This does two things - it keeps your knots from coming undone, and it also makes it so that the opposite colors appear on the edges of your blanket.  So on this one, the blue side has orange fringe and the orange side has blue fringe.  At this point I start removing my pins once I've tied past that point and no longer need the fabric held.


You're done!  Now, for presentation purposes, I folded mine in half lengthwise, then rolled it up like a sleeping bag, so that when I was done, the top had a circle of fringe and the fringe went down the side.  Then I used the long scrap strips to tie the blanket up and keep it rolled.  And this is what I ended up with.


I don't have a picture of it laid it out in full and the model I threw it over was only 5'4, so it doesn't really capture the size, but the overall lenth ended up being about 6ft 10 inches long.